I have another resolution for 2010 that I forgot about - to be more decisive. I'm terrible at making decisions, especially decisions that are expensive or difficult to undo.
I'm back to considering wallpaper. Again, I know. This turquoise wallpaper by Signature Prints is still top on my list of choices.
I love it but I'm thinking it may be too bright for my home. The plan is to place the wallpaper in either the living room (on the wall where the TV is) or the wall directly facing the entrance to our home. I like the idea of placing the wallpaper at the entrance. The entrance, dining and living spaces are all shared which is why I have placed them here together with the wallpaper to get a better feel it.
Tuesday, December 29, 2009
Monday, December 28, 2009
Why hello there!
Did you have a nice Christmas? Was Santa good to you? We had a lot of fun and food and there was a bit of impromptu Greek dancing too.
The last couple of days following Christmas have been nice too spent doing, well, nothing really. It has given me time to think about the new year. I'm not one to set new year's resolutions because I usually forget them quickly but 2010's resolution is an easy one - I will focus on loving the people around me and doing the things I love to do.
Not that I really need a reminder of this resolution but just in case, I have moved the print above to the entrance of our home. I like the look of it there too.
Do you set new year's resolutions?
Also, a big thank you to those who voted for me at The Homies. I really do appreciate the love.
Thursday, December 24, 2009
Happy Holidays and Merry Christmas!
Have a beautiful day tomorrow and a lovely weekend. I'm signing off until next week. My posts may be very few next week as I take the time to spend it with family and friends. I encourage you to do the same if you can or at least enjoy the weather you are having. Relax, unwind, cook, eat, dance, smile, read - do whatever it is that makes you happy.
Until next week, have fun!
P.S: Oh and I almost forgot to mention, I've been nominated into The Homies, an award run by Apartment Therapy. If you've enjoyed my blog I would love for you to vote for me here. Check out some of the other blogs listed while you are there. There are some great blogs I've only just discovered. And big thanks to Holly for the nomination!
P.P.S: In case anyone is wondering I did paint the door a darker shade. I settled on Dulux Dewpoint (1/2 strength). A tutorial for the pom-pom decoration pictured can be found here.
P.P.P.S: Okay I'll shoosh now I promise. Merry Christmas friends and thank you for all of the support you've shown me over the last year. I wish I could give each and every one of you a huge hug to show you just how much I appreciate it. Thank you.
Pom-pom 'wreath'
I knew that I didn't want a traditional wreath for our brand new blue door so I adapted the Martha Stewart pom-pom tutorial to make a slightly different 'wreath'. It's not really a wreath I know but it is something decorative for our door and a little bit Christmas-y. A few people have asked me to post instructions for the projects I do. Sometimes I feel as though what I create is too simple to warrant step-by-step instructions but I promise I will provide more detailed posts in the New Year if you find them helpful.
Below are the instructions for the pom-pom 'wreath' if you would like to try it yourself.
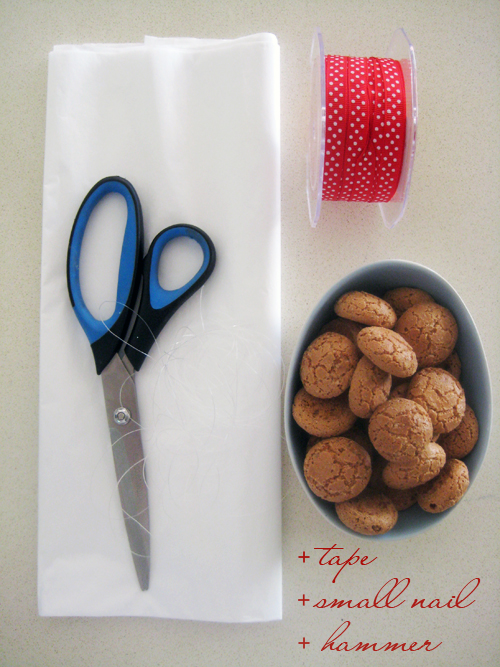
Materials:
Tissue paper
Ribbon
Scissors
Fishing wire (or floral wire but I didn't have any handy)
Tape
Nail & hammer
A bowl of biscuits to snack on
Instructions:
Steps 1-5 are very similar to Martha Stewart's instructions which can be found here.
1. Separate your tissue paper into 3 x 8 sheet piles. Cut the first pile so that it is 10 x 13 inches, the second 10 x 10 inches and the third 10 x 8 inches. This will make 3 pom-poms of different sizes.
2. Lay the tissue paper so that the 10 inch sides are the left and right sides of the paper when laid out in front of you (hope that makes sense!). Start with the first pom-pom and make 1 inch accordian folds.
3. Wrap fishing wire or floral wire around the middle of the stack of folds and secure. Leave the two lengths of fishing wire. You will need them to secure the ribbon to the pom-poms later.
4. With scissors trim the edges of the tissue into rounded shapes.
5. Separate each layer carefully (they are really easy to tear) towards you. The back of the pom-pom can be left flat or you can make your pom-poms round all the way around if you prefer. I left mine flat so that they look more like flowers and sit flat against the door.
6. Cut a long length of ribbon (about 50 inches or more depending on whether you want long strands hanging on your final wreath or not). Tie the fishing wire that is already secured to the pom-pom around one end of the ribbon leaving enough length (about 8 inches) so that a little bit of ribbon can hang below the pom-pom. Tie the ribbon into a double knot or bow to secure.
7. Tape the the longer length of the ribbon to the top part of the pom-pom so that the pom-pom sits upright when hanging. Don't worry if you can see the ribbon through the paper. You can fluff up your pom-pom afterwards to hide it.
8. Repeat steps 2-7 for the remaining two pom-poms.
9. Arrange the pom-poms on the table so that they are staggered and tie the three ribbons together into a knot.
10. Hammer a small nail into your door and hang or secure the pom-poms to your door in another way if you don't want to make a hole. Optional: Roll a piece of tape and secure each pom-pom to the door if you don't want them to blow in the wind. Tie a bow at the top and enjoy your creation! Don't forget to eat any remaining biscuits.
Do you like this tutorial? I would love to know what you think. Please feel free to leave me a comment below.
P.S: I really hope the measurements are correct. I was enjoying my biscuits way too much and forgot to take a few measurements so please consider them estimates.
P.P.S: This 'wreath' is only suitable if you door is under an awning or cover and won't be affected by wet weather, otherwise rain + paper = a soggy mess.
Below are the instructions for the pom-pom 'wreath' if you would like to try it yourself.
Materials:
Tissue paper
Ribbon
Scissors
Fishing wire (or floral wire but I didn't have any handy)
Tape
Nail & hammer
A bowl of biscuits to snack on
Instructions:
Steps 1-5 are very similar to Martha Stewart's instructions which can be found here.
1. Separate your tissue paper into 3 x 8 sheet piles. Cut the first pile so that it is 10 x 13 inches, the second 10 x 10 inches and the third 10 x 8 inches. This will make 3 pom-poms of different sizes.
2. Lay the tissue paper so that the 10 inch sides are the left and right sides of the paper when laid out in front of you (hope that makes sense!). Start with the first pom-pom and make 1 inch accordian folds.
3. Wrap fishing wire or floral wire around the middle of the stack of folds and secure. Leave the two lengths of fishing wire. You will need them to secure the ribbon to the pom-poms later.
4. With scissors trim the edges of the tissue into rounded shapes.
5. Separate each layer carefully (they are really easy to tear) towards you. The back of the pom-pom can be left flat or you can make your pom-poms round all the way around if you prefer. I left mine flat so that they look more like flowers and sit flat against the door.
6. Cut a long length of ribbon (about 50 inches or more depending on whether you want long strands hanging on your final wreath or not). Tie the fishing wire that is already secured to the pom-pom around one end of the ribbon leaving enough length (about 8 inches) so that a little bit of ribbon can hang below the pom-pom. Tie the ribbon into a double knot or bow to secure.
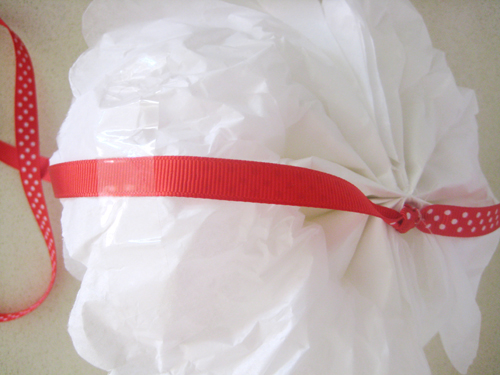
7. Tape the the longer length of the ribbon to the top part of the pom-pom so that the pom-pom sits upright when hanging. Don't worry if you can see the ribbon through the paper. You can fluff up your pom-pom afterwards to hide it.
8. Repeat steps 2-7 for the remaining two pom-poms.
9. Arrange the pom-poms on the table so that they are staggered and tie the three ribbons together into a knot.
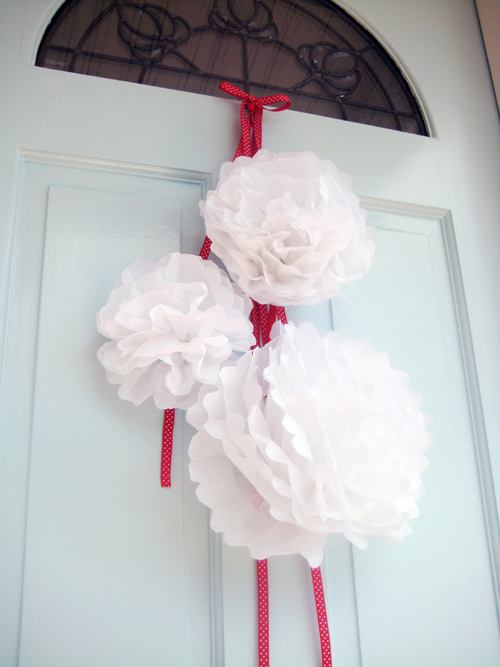
10. Hammer a small nail into your door and hang or secure the pom-poms to your door in another way if you don't want to make a hole. Optional: Roll a piece of tape and secure each pom-pom to the door if you don't want them to blow in the wind. Tie a bow at the top and enjoy your creation! Don't forget to eat any remaining biscuits.
Do you like this tutorial? I would love to know what you think. Please feel free to leave me a comment below.
P.S: I really hope the measurements are correct. I was enjoying my biscuits way too much and forgot to take a few measurements so please consider them estimates.
P.P.S: This 'wreath' is only suitable if you door is under an awning or cover and won't be affected by wet weather, otherwise rain + paper = a soggy mess.
Tuesday, December 22, 2009
Pink Christmas Tree
Have you seen Nicole's pink Christmas tree and all the pretty things she has decorated it with? It is making me crave a pink Christmas tree of my own although it suits her home and style perfectly.
I can't believe Christmas is only a few sleeps away. The last few days just flew too fast. I'm glad I've finished my Christmas shopping though. Are you finished too?
Painting the front door
Inspired by the images I posted yesterday I really did start painting the front door. It needed a fresh coat of paint anyway.
Monday, December 21, 2009
A pale shade of blue
These images make me want to paint our front door, furniture and stairway blue. I already have a few sample paint tins in similar shades of blue. Tempting!
(Images Domino, Morgan Harrison Home, unknown)
Etsy Picks: Pillow crush
I know you don't need another reason to spend right now, what with all the crazy gift buying you may have been doing lately but check these out and have another look in the New Year when your credit card recovers... I know I will be anyway.
1. The stamped style of this birdcage pillow made by sugarandfig is super cute. It is an original linocut design printed onto a cream cushion.
2. This pillow is inspired by mid-century modern design and it is the straight clean edges and tufting that drew me in. It is made of grey wool blend felt and filled with 100% eco-friendly bamboo fibre. Designed by the red stitch (cute shop name!)
3. I like a touch of red in the home so this trellis pillow by humble collection is perfect for me. It comes in other colours too and is printed onto 100% organic cotton twill.
4. How adorable is this LOVE pillow cover by Nuka? The text looks like stitching and is screen printed by hand onto 100% cotton.
5. Ruffles! Over fifty petals make up the floral cluster in this pillow, each hand cut and hand stitched by Pillow Pallooza. This one would be a splurge.
6. By now you have probably already come across Track and Field Designs owned by Sasha who works from Vancouver. I think I have had Sasha's work on my favourites list since I first joined Etsy as a customer. My favourite is the fawn pillow. It is not currently listed in her store but there are other equally as lovely pillows for sale.
7. I already own this Skinny laMinx herd cushion cover in red and now the grey colour is tempting me. The design is based on a 2000 year old cave drawing and the fabric is 100% cotton with a linen texture to it.
I must resist.
1. The stamped style of this birdcage pillow made by sugarandfig is super cute. It is an original linocut design printed onto a cream cushion.
2. This pillow is inspired by mid-century modern design and it is the straight clean edges and tufting that drew me in. It is made of grey wool blend felt and filled with 100% eco-friendly bamboo fibre. Designed by the red stitch (cute shop name!)
3. I like a touch of red in the home so this trellis pillow by humble collection is perfect for me. It comes in other colours too and is printed onto 100% organic cotton twill.
4. How adorable is this LOVE pillow cover by Nuka? The text looks like stitching and is screen printed by hand onto 100% cotton.
5. Ruffles! Over fifty petals make up the floral cluster in this pillow, each hand cut and hand stitched by Pillow Pallooza. This one would be a splurge.
6. By now you have probably already come across Track and Field Designs owned by Sasha who works from Vancouver. I think I have had Sasha's work on my favourites list since I first joined Etsy as a customer. My favourite is the fawn pillow. It is not currently listed in her store but there are other equally as lovely pillows for sale.
7. I already own this Skinny laMinx herd cushion cover in red and now the grey colour is tempting me. The design is based on a 2000 year old cave drawing and the fabric is 100% cotton with a linen texture to it.
I must resist.
An updated look
Do you like? I hope so.
I have been working on the layout for a little while and wanted this site to tie in with my other sites for a more cohesive look. It is not as bright as the old design and hopefully easier on your eyes. I have also popped some links in the header to various sections of this site for easier navigation and included a home tour with before shots that you may not have seen before.
Enjoy!
(and do let me know if the new layout looks a little broken to you)
Sunday, December 20, 2009
Dandi giveaway winners
Thank you for all of your entries and for sharing your Christmas plans. I love that many of you are spending it with family and with lots of food. I think Christmas is one of those occassions where you can eat your body weight in food and not feel guilty. At least you shouldn't feel guilty just this one day. We are spending it with family too. Every year there is LOTS of Greek and Lebanese food and I plan on eating it all. Okay, maybe not all.
And now to announce the winners of the giveaway picked randomly via random.org:
Bobishi
Clarissa
Chantelle
Cat
Congratulations! Please contact me at viv [at] ishandchi [dot] com with your address details so that I can send your prize to you (and fingers crossed it reaches you in time for Christmas).
Thanks again for your entries and for your Christmas wishes!
Update (1/1/10): Unfortunately I have needed to redraw one of the giveaway prizes because I have not heard from the winner. Shan, congratulations, please contact me at your earliest convenience so that I can send you your prize.
Friday, December 18, 2009
Pretty bathrooms + Before & After
I'll take any one of these pretty bathrooms please. I have been looking for inspiration for the day when we can gut our bathroom and start from scratch. That day is a long way away though...
At the moment our bathroom looks like this:
Which is much better to the way it used to look (the brighter photography in the after shot helps too, of course):
The bathroom had a double sink vanity and no toilet. I never understood that. My theory is the house used to have a separate outdoor toilet which was then moved into the laundry during one of its previous renovations before we bought the home. You would have to walk through the kitchen and laundry to get to it. Anyway, we fixed that when we moved in but didn't put a lot of thought into the design at the time because we just wanted a functioning bathroom. I sure would love a huge ornate mirror, freestanding bath and a ruffly shower curtain but I don't mind the way it looks now.
Have a wonderful, relaxing weekend. It's going to be a crazy week next week (Christmas!).
PS: I'm enjoying reading all your Christmas plans! Please keep them coming. Entries into the giveaway close this Sunday.
(Images 1 & 2: Country Living & 3: Design is mine)
Thursday, December 17, 2009
Giveaway: Celebrate Christmas with Dandi
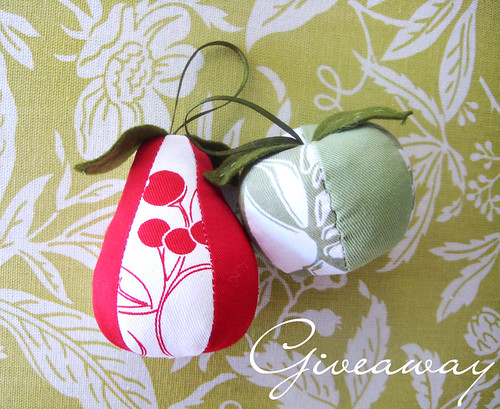
The Dandi girls have done it right again with adorable fabric ornaments to celebrate Christmas. I almost want to eat them. They have generously given me five sets of these ornaments to give to YOU! Each set includes a pear and an apple in lovely green and red Dandi fabrics. They would look cute displayed on the Christmas table or hung from your tree (or, umm.. your ears as I may or may not have done with mine).
The five sets are wrapped up and ready to go. For your chance to win one of these ornament sets valued at $19.90, simply leave a comment on this post by 5pm Sunday 20th December. To make it fun (and you don't have to), perhaps you can tell me how you plan to spend your Christmas? I'll announce the winners by 6pm on Sunday. Be sure to check back then to see if you have won and I'll post them out to you on Monday so that you can (hopefully!) receive them in time for Christmas.
Unfortunately I can only send these ornaments to Australian residents because they won't reach international readers in time for Christmas (so sorry!). See more Dandi goodness on their website and blog.
Good luck!
UPDATE: Entries closed. Winners to be announced shortly.
(Images ish and chi & Dandi)
New in store: Hot Air Balloons!
These are fun don't you think? I've been working on the design of these hot air balloons over the last few days. I wanted to get the shape and drawing just right. I'm really happy with the way they turned out. I might make one to display in Robert's room.
I have also listed a whole bunch of Butterfly Trees and worked on new photography. Customers sometimes ask me which designs work well together so I have shot some displays to give an idea of how the designs can be mixed and matched.
These designs and more are available in my Etsy store.
Congratulations to...
... the lucky last commenter - AJ!
You've won the Trunk Show Kids giveaway. Please contact me at viv [at] ishandchi [dot] com with your address details so that we can send you out your kinder bag. Thanks everyone for entering!
If you haven't already, don't forget to sign up for the Trunk Show Kids newsletter so that you can be one of the first to know about all the bargains.
If you missed out on the prize this time then check back later this afternoon. I have more prizes to give away from another great sponsor! 'Tis the season to give after all isn't it?
Wednesday, December 16, 2009
Living glamorously
I don't have a photographic memory but there are some images I can't forget. Stuck in my mind for a while now are images of a home I had once seen in a magazine. I remember the velvet used in the home, the white walls, dark floors and touches of green. I remember this home because it is different to other homes I have seen - glamorous, colourful and a little over the top. Why not? I only wish I had torn out the pages of this magazine and kept them as reference.
I have been trying to track down these images but I couldn't remember which magazine I had seen them in let alone which issue. I came across them today and found they are from Australia Vogue Living March/April 2006. Wow - I remember this home from that long ago? I'm impressed with myself.
The Melbourne couple who live here wanted to replace their minimalist home with something 'wow' and after being inspired by a visit to the Viceroy in Santa Monica they approached local designer Jean-Pierre Heurteau to create a similar look.
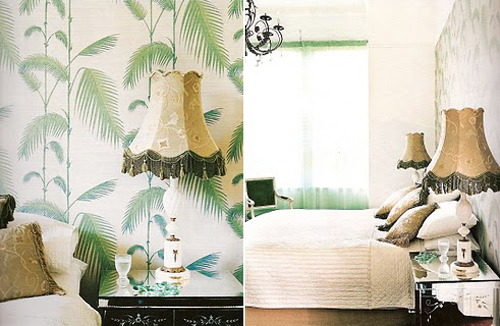
My favourite parts are the green velvet dining chairs, the contemporary Aboriginal art, the freestanding bath, glossy black floors, bedroom wallpaper by Cole & Son and the green touches here and there. I'm inspired all over again after seeing these images and green isn't even a colour I'm usually drawn to.
Are there homes that 'stick' in your mind? I would love to hear about them.
(Images Australia Vogue Living March/April 2006 found via Studio Annetta)
Tuesday, December 15, 2009
Christmas decorating at ish and chi
I'm feeling it now. I really am. Christmas is right around the corner. My local post office tells me there are 10 more sleeps to go. They've been counting down for months.
We aren't putting our Christmas tree up this year. Robert would tear it down in an instant. I wanted the house to feel festive though, for him and us, so I decorated the dining table with Christmas gifts and goodies.
I also made the hanging bauble chandelier thing. Mine didn't turn out nearly as good as the pictures because I don't have enough baubles but at least it's something and Robert loves to point at it.
Decorating the dining table means we now have to eat TV dinners but never mind. Only 10 more sleeps to go and there are still lots of carols to be sung.
Pssst: There are some gifts on the table for YOU. I'll tell you more very soon.
Monday, December 14, 2009
Before & After: The second chair recovered
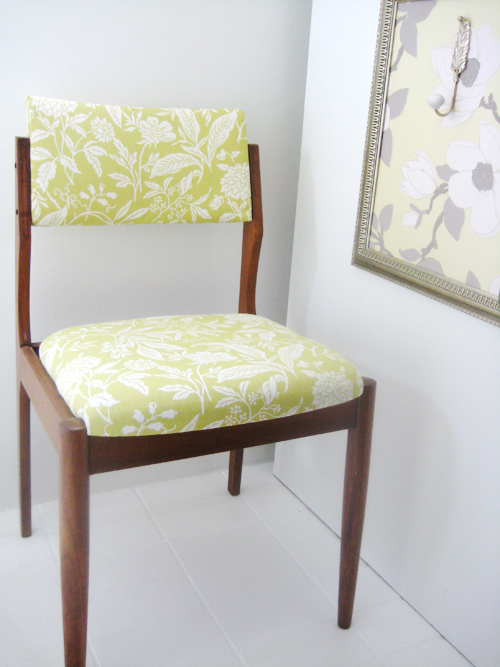
Hi there! Was your weekend full of food and good people? I hope so. I finally got around to recovering the second chair I picked up a while ago. I much prefer this floral fabric to the red fabric I used for the other chair. I contemplated painting the frame of this chair in white but I'm glad I didn't.
The pattern on the new chair reminds me somewhat of the wallpaper in this room.
As a reminder, here's how the chair used to look. Am I mourning the loss of the orange vinyl? Nuh-uh.
Did you finish off any projects over the weekend?
PS: Don't forget to enter the Trunk Show Kids giveaway if you haven't already.
(Image 1-4 me, 5 Elle Decor via Ada & Darcy, 6 me)
Friday, December 11, 2009
Fashion Friday: The sparkly headband
I came across this handmade headband in a local gift and homeware store. The soft white and grey colours sold me as I'm loving that combination at the moment. Usually during summer I'm drawn to brighter colours but not this year for some reason.
I have been saving photos of grey and white interiors too, like this image from Vogue Living Australia. I would die for those studded chairs.
What are your plans for this weekend? I'm catching up with friends and spending time with the family. Robert has become a little chatterbox and I have been trying my best to understand what he is saying. His favourite word at the moment is "no". I ask him, "Did you have a good sleep Robert?" and he says "No" in a serious tone and then bursts into a fit of giggles. It's the little things he does that make me smile.
Have a lovely weekend!
(Images 1 & 2 me, 3 Vogue Living Australia)
Handmade address book box
I came across these address books via Haus Maus. Holly finds the best things don't you think? I bookmarked the store and have been looking for an excuse to buy one of these beautiful handmade address book boxes ever since. I finally bought one to give as a Christmas gift to a friend and it arrived yesterday so I snapped a few photos to show you.
Like Holly, I too love the tactile feel of paper which is what appealed to me about this address organiser and I just know my friend will love it. The organiser is well made, sturdy, filled with lots of pretty papers and comes with a little thank you note. That's one reason why I love shopping on Etsy - you feel like a valued customer.
The organiser reminds me of the old library index card systems. Do you remember those? It makes me a little sad to think it is something my son won't experience in our digital age. Perhaps that's a good thing though. I remember it taking forever to find a book the old way, flipping through hundreds of cards and singing the alphabet in my head as I tried to locate the right card (I was only young).